Bromeliads
BackBromeliads are fantastic plants that provide some of the most brilliant flower spikes and colourful foliage within the plant world. Most of us here at OCP love them for their colour and easy care but Karen (one our horticulturists) is absolutely mad for them. She thinks every garden should have at least one clump of them growing and it’s hard to disagree!
Bromeliad Types
The best known bromeliad is one we eat: pineapples. Yep pineapples are a type of bromeliad! There are many other types but the most common are aechmeas, tillandsias (air plants), vriesas, neoregelias, billbergias and guzmanias. Sorry but aside from the air plants they don’t have easy common names.
Many produce large colourful flower spikes which last for weeks whilst others produce colourful leaves at the time of flowering instead of showy flowers. Some clever bromeliads will do both! When in flower bromeliads can be brought inside and enjoyed for a couple of weeks before being returned outdoors.
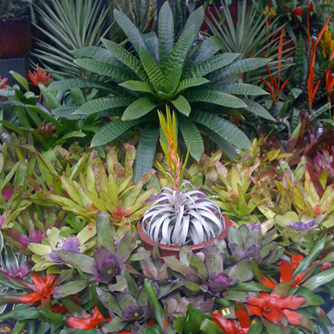
Colourful display of different bromeliad types
Growing Conditions for Bromeliads
Most bromeliads are epiphytes or lithophytes which means they grow on another plant or a rock surface. They don’t harm the host plant as their simple root system is mostly to just hold the bromeliad in place. Some of the air plants (tillandsias) don’t have any roots at all and just intertwine themselves in branches as they grow. Nutrients (like dust and animal droppings) are mainly absorbed through their leaves and the reservoir of water held in the central “vase” structure. A small number do grow in soil that is extremely free draining.
Bromeliads come from the south of America and grow in a wide range of conditions from tropical zones to cool mountain conditions (but only a few can handle light frost). It is a broad group of plants so it is difficult to generalise but many are very tough and can survive long periods without water. Those with rich green leaves that are soft and usually without prickles do best in bright shade or morning sun. Bromeliads with thick grey leaves (often with more prickles) need more sun. Another general rule is the more summer humidity present then the more sun they can handle.
In home garden situations bromeliads can be tied to trees and walls where they will happily grow and attach new roots to their host over time. Old stockings are often used because they will eventually break down and not strangle the trunk of the tree.
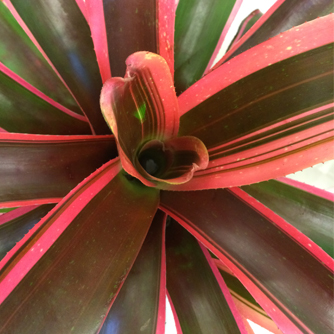
Aechmea with striking foliage
Bromeliads are also very commonly grown in pots where coarse orchid potting mix is used to ensure that very good drainage is achieved. The giant aechmeas and alcantareas make stunning feature container plants.
If you want to put bromeliads in a garden bed then keep the plant in its pot (with orchid mix) and sink the whole thing into the soil. They will look like they are planted in soil but will still have excellent drainage around their roots.
Watering & Fertilising Bromeliads
As mentioned the leaves of most bromeliads grow in a rosette shape which forms a well or vase in the centre that holds water. The well then provides moisture and nutrients to the plant. When watering just make sure the bromeliad has water in the well and don’t worry if the potting mix is dry.
Air plants (tillandsias) are a little different as many don’t have a well but instead absorb moisture and nutrients mainly through the leaves. Give them a squirt with the hose when watering the garden or mist with a spray bottle. When it’s hot and dry then spray weekly and reduce to every couple of weeks during cooler weather. The very fine leaf tillandsias will require more frequent misting in regions which naturally have low humidity levels.
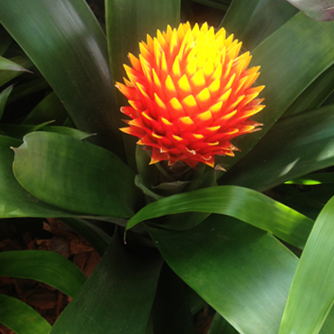
The flower spike on this guzmania is unmissable
Bromeliads benefit from light fertilising which is repeated often (like orchids). We recommend spraying the foliage every 2-4 weeks with the low dose rate of OCP eco-aminogro and OCP eco-seaweed.
Dividing Bromeliads
Bromeliads are unusual because once the main plant flowers it won’t flower again. Instead it will produce several new plants mostly from the base that are called ‘pups’. As the pups grow the original plants starts to get tatty. Eventually it will die outright but in the meantime you have a congested mass of new plants mixed with dying leaves of the older plants. The answer is to divide them.
When the pups are about a third of the size of the parent plant simply cut them off with secateurs. Be sure to cut close to the parent plant so there is some woody tissue attached to the pup. Repot in a free draining potting mix (like orchid potting mix) making sure the base of the pup is not buried too deeply. You may need to insert some small bamboo skewers/stakes to keep the pup upright until roots form. Then fill up the well with the OCP eco-aminogro and OCP eco-seaweed solution. Done!
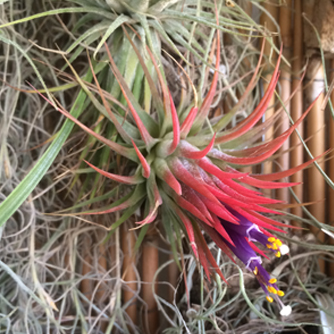
Air plant (Tillandsia ionantha) in flower
Pest & Disease Problems of Bromeliads
Bromeliads are relatively pest and disease free although there are a few things to watch out for:
- Scale is the most common problem, often building up on the lower part of the leaves. Remove any old leaves and then soak the entire plant in a botanical oil solution that is registered for scale control. Turn the plant upside down to allow the solution to drain out of the plant centre and the foliage fully dry. Note: traditionally bromeliads have been very sensitive to oil sprays and they are generally never recommended to be used on them. However this relates to oil sprays made from petroleum oil eg white oil. Plant based oil sprays are safer to use on bromeliads but if in doubt do a test spray first.
- Grasshoppers will also chomp on bromeliads but they can be controlled with a few sprays of OCP eco-neem.
- Root rot can occur from over watering and/or poor drainage. Reduce the frequency of watering and repot into a coarse orchid mix.
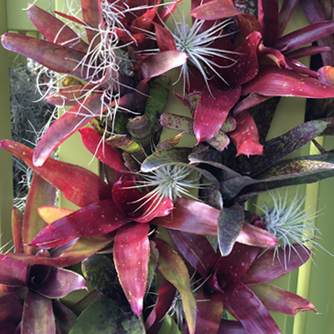
Bromeliads look great growing vertically on walls
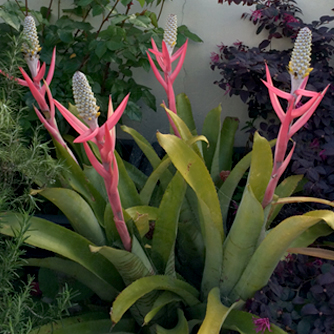
Large growing Aechmea maculata in flower


